Salads
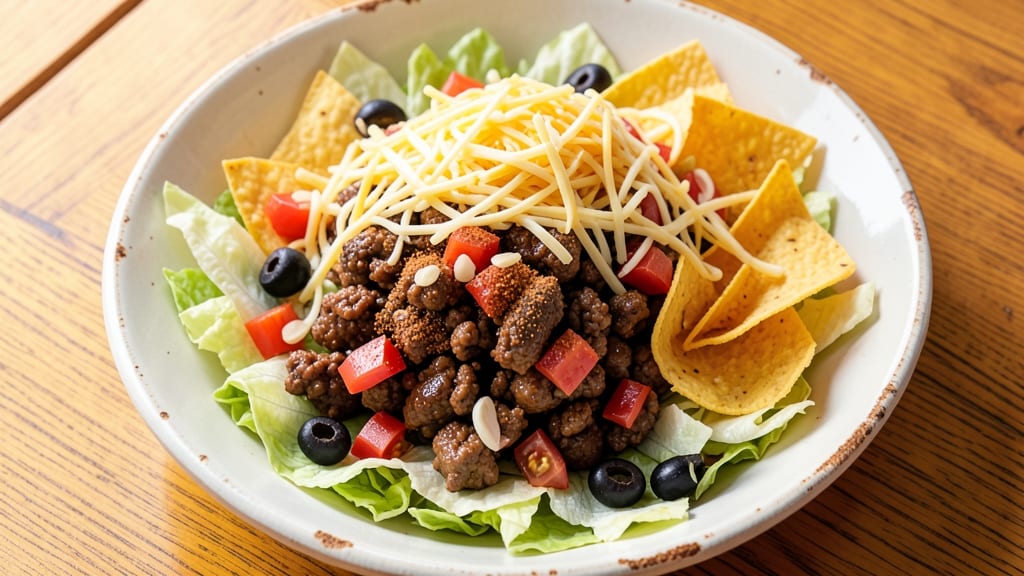
This 1970's taco salad recipe brings back the bold, crunchy flavors of a bygone era when taco salads ruled lunch counters and dinner tables. 💛 The magic starts with seasoned ground beef or shredded chicken, simmered with classic taco spices—cumin, chili powder, and a touch of garlic—that transport you straight to a retro diner.
What makes this dish special isn’t just the taste, but the nostalgic presentation, where crisp lettuce cups or a bed of tortilla chips serve as the perfect base for all the vibrant toppings.
The assembly is where the fun happens—layering warm, spiced meat with cool, creamy sour cream, sharp cheddar cheese, and tangy diced tomatoes. A sprinkle of fresh cilantro and a drizzle of salsa verde add brightness, balancing the rich, savory flavors.
This isn’t just a salad; it’s a full meal with texture and depth, designed to be shared and savored. The retro touch? Serving it in a crisp lettuce cup or over a pile of crushed tortilla chips for that classic crunch.
What you’ll end up with is a dish that’s hearty, satisfying, and packed with the kind of bold flavors that defined 1970s comfort food. The combination of warm spices, cool toppings, and that satisfying crunch makes every bite feel like a trip down memory lane.
It’s the kind of recipe that’s easy to customize—swap in black beans for extra protein or add avocado for creaminess—but always delivers that nostalgic taco salad experience.
Perfect for game day, a casual lunch, or a fun retro-themed dinner, this recipe is all about bringing back the joy of a classic dish with modern twists. Let’s get cooking and recreate the flavors of a decade that never went out of style.
Ingredients for 1970's taco salad
Six hearty servings of retro taco salad with bold spices and satisfying crunch.
| Ingredient | Amount | Notes |
|---|---|---|
| Ground Beef (80/20) 🥩 | 2 lb | Lean but flavorful, pre-seasoned optional |
| Taco Seasoning 🌶️ | 2 tbsp | Homemade or store-bought (check for no added salt) |
| Garlic Cloves 🧄 | 4 cloves | Minced for deep flavor |
| Iceberg Lettuce 🥬 | 1 head | Crisp, for lettuce cups |
| Tortilla Chips 🍟 | 10 oz | Crushed for classic crunch |
| Shredded Cheddar Cheese 🧀 | 2 cups | Sharp cheddar preferred |
| Sour Cream 🥛 | ½ cup | Full-fat for best texture |
| Diced Tomatoes 🍅 | 1 ½ cups | Fresh or canned, drained |
| Fresh Cilantro 🌿 | ¼ cup | Chopped, for brightness |
| Salsa Verde 🌶️ | ½ cup | Store-bought or homemade |
| Black Olives 🫒 | ½ cup | Sliced, pitted |
| Olive Oil 🫒 | 1 tbsp | For cooking beef |
| Salt 🧂 | ½ tsp | Adjust to taste |
| Black Pepper 🌶️ | ½ tsp | Freshly ground |
The ground beef is the foundation—80/20 blend for that juicy, flavorful bite. Kroger or Costco sell pre-seasoned ground beef, but I prefer cooking my own with taco seasoning for full control. Look for bright red, well-marbled meat at the butcher counter—it makes all the difference. The garlic? Freshly minced (not jarred) adds depth, and if you're short on time, a garlic press works. For the lettuce, iceberg stays crisp longer than romaine, which is key for those classic lettuce cups. If you're serving a crowd, pre-shredded cheese saves time, but fresh-shredded melts better.
No taco seasoning? Mix 1 tbsp each chili powder, cumin, paprika, plus 1 tsp garlic powder and salt—that’s my go-to blend. Swap the beef for shredded chicken (cooked with the same spices) or black beans for a vegetarian twist. The tortilla chips? Store-bought crushed chips are fine, but if you're feeling fancy, toast them lightly in olive oil for extra crunch. For the tomatoes, vine-ripened tastes best, but canned diced tomatoes in juice work in a pinch. The cilantro? Fresh is non-negotiable—dried just doesn’t cut it here. And if you’re avoiding dairy, avocado slices make a great creamy substitute for sour cream.
Prep ahead to save time: Cook the beef and let it cool before assembling—it reheats beautifully. Store toppings separately in the fridge for up to 3 days, then assemble just before serving. The lettuce cups stay crispest if you wrap them in damp paper towels and store them in a sealed container. This salad tastes even better the next day as the flavors meld—double the batch if you can, it’s that good. For leftovers, cover tightly and keep in the fridge for up to 4 days, though the crunch might soften slightly after day 2.
Why You'll Love This Recipe
- One-Pan Wonder: I swear by this for lazy nights—just brown the beef with garlic, dump in the seasoning, and let it simmer. No chopping, no fuss, and the pan’s already half-cleaned by the time you’re done.
- Crunchy Garlic Magic: That 80/20 beef with minced garlic? It’s where the real flavor lives—juicy, slightly charred edges, and a punch of heat that lingers. Honestly, the chips and lettuce just hold everything together while the beef steals the show.
- Tailgate or Tuesday: Between us, this feeds a crowd without breaking the bank. Pack it in a cooler for game day, or toss leftovers into a thermos for lunch—crunchy chips stay crisp, and the beef stays warm. (Yes, even on a Tuesday night.)
- Budget Stretch: A pound of ground beef, a bag of chips, and a head of lettuce—this is the kind of meal that makes grocery day feel like a win. Double the batch, and you’ve got dinner covered for days without sacrificing taste.
Step-by-step instructions for 1970's taco salad
Here's how to build a true retro taco salad with bold flavors and that iconic crunch.
🔥 Step 1: Cook the Ground Beef Perfectly
Heat the 1 tablespoon olive oil in a large skillet over medium-high heat until shimmering. Add the 2 lb ground beef (80/20) and break it apart with a wooden spoon, letting it brown in 3-4 minute batches. Don't overcrowd the pan—this prevents proper browning.
Once the beef is well browned, add the 4 cloves minced garlic cloves and stir for 30 seconds until fragrant. Sprinkle in the 2 tablespoons taco seasoning, ½ teaspoon salt, and ½ teaspoon black pepper, then add ½ cup water. Bring to a simmer and cook for 5-6 minutes until the liquid reduces and the beef is fully cooked. The mixture should have a thick, saucy consistency.
👨🍳 Step 2: Prepare the Lettuce Cups
While the beef cooks, rinse and thoroughly dry the 1 head iceberg lettuce. Remove the outer leaves and separate the remaining leaves into individual cups. You'll need about 12-15 cups—each should be large enough to hold ½ cup of filling. Keep them in a large bowl lined with paper towels to catch excess moisture.
Here's the thing—don't skip drying the lettuce. Even slightly damp lettuce will make your salad soggy. Pat each leaf dry with a clean towel before using. The crisp texture of the lettuce is what makes this salad feel authentic to the '70s.
🥘 Step 3: Assemble the Salad Layers
In a medium bowl, combine the cooked ground beef with the 1.5 cups diced tomatoes, 0.5 cup salsa verde, and 0.5 cup sliced black olives. Stir gently to distribute the toppings evenly. Taste and adjust seasoning if needed—you might want to add a pinch more salt or a squeeze of lime if you have it.
Now for the layering: Spoon about ½ cup of the beef mixture into each lettuce cup. Top each with 2 tablespoons crushed tortilla chips (reserve some for garnish) and 2 tablespoons shredded cheddar cheese. The chips should be crushed coarsely—this gives that classic '70s crunch without being too fine.
🍽️ Step 4: Finish with Toppings and Serve
Just before serving, sprinkle each salad with 1 tablespoon chopped fresh cilantro and a dollop of 1 tablespoon sour cream. The sour cream should be full-fat for that authentic retro texture. For extra crunch, add a final layer of crushed tortilla chips on top of each salad.
Serve immediately while everything is crisp and the lettuce is still holding its shape. The combination of warm beef, cool sour cream, and crunchy chips creates that perfect balance of textures that makes this salad so satisfying. For a true '70s experience, serve with a side of extra chips and a cold glass of cola.
Pro Tips For Making 1970'S Taco Salad
- CRISP THE LETTUCE FIRST: Iceberg stays soggy if you pile it wet on top of everything. Tear the leaves dry, then give them a quick 30-second zap in the microwave—just enough to soften edges without wilting. Works like a charm, especially if you’re prepping ahead.
- SALT THE BEEF BEFORE SEASONING: I used to just dump taco seasoning on raw ground beef, but that’s missing the mark. Start with a pinch of kosher salt and a crack of black pepper before adding the seasoning packet. It keeps the meat juicier and lets the spices stick better—trust me, it’s worth the extra 10 seconds.
- DON’T OVERMIX THE GARLIC: Minced garlic burns fast, and once it’s bitter, there’s no fixing it. Sauté those cloves whole for 30 seconds until fragrant, then crush them with the side of your knife right in the pan. You’ll get flavor without the harsh bite that ruins the whole dish.
- USE COLD CHIPS FOR CRUNCH: Warm tortilla chips turn soft and sad when mixed with warm beef. Keep a separate bowl of chips in the fridge until serving, then toss them in just before eating. Your salad’s texture will thank you—no one likes a mushy taco salad, even in the ‘70s.
Essential equipment for this dish
Skillet Essentials
You’ll need a 12-inch cast-iron skillet or stainless steel skillet for browning that 2 lb ground beef—cast iron retains heat beautifully for even cooking. I swear by a Lodge cast-iron skillet for its durability and heat distribution.
If you don’t have cast iron, a non-stick skillet works too, but avoid overcrowding the beef to prevent sticking. A wooden spoon is ideal for breaking up the meat without scratching your pan. 🔥
Lettuce Prep Tools
For crisp lettuce cups, grab a sharp chef’s knife and cutting board—iceberg lettuce needs clean cuts to form sturdy cups. A mandoline slicer speeds up the process if you’re prepping for a crowd, but hand-cutting gives you more control.
Keep a stack of paper towels nearby to pat leaves dry; moisture is the enemy of crisp lettuce. I also recommend a large mixing bowl lined with paper towels to hold the lettuce cups while you work.
Crushing Chips Like a Pro
Crushed tortilla chips add that iconic retro crunch, and a rolling pin or heavy drinking glass works perfectly for crushing 10 oz of chips. For even coarser texture, pulse them in a food processor or blender (just 2-3 quick pulses).
Store any extra crushed chips in an airtight container to keep them fresh for garnishing later. Pro tip: Toast crushed chips in 1 tbsp olive oil for 1-2 minutes at 350°F to enhance their flavor before using. ✨
Serving with Style
A large serving platter or individual lettuce cups arranged on a platter makes this dish look retro-chic. For extra flair, add a small bowl of sour cream and salsa verde on the side, along with a plate of extra chips for crunch.
I love using a wooden serving board for that vintage diner feel. Don’t forget a sharp knife for slicing avocados (if using) and a small bowl for chopped cilantro—presentation matters in retro-style dishes! 💛
Optional Upgrades
For a blender, add homemade salsa verde—blend 1 cup cilantro, 1 jalapeño, 1 garlic clove, ½ cup lime juice, and ½ tsp salt for a fresh twist. A meat thermometer ensures your beef reaches 160°F safely.
If you’re feeling fancy, a tortilla press makes crispy lettuce cups even sturdier. And for serving, a chilled glass of cola completes the 1970s vibe perfectly. 🍹
Nutrition facts
Frequently asked questions
Can I make this taco salad vegetarian?
Swap the ground beef for 1.5 cups cooked black beans or 1 lb crumbled firm tofu seasoned with the same taco spices. For extra protein, add ½ cup corn kernels or ½ cup diced bell peppers to the mix. The texture will be slightly different but still delicious.
Why does my lettuce get soggy?
Lettuce turns soggy when it absorbs moisture from wet ingredients. Always pat lettuce leaves completely dry before assembling and avoid overloading with saucy toppings. For extra crispness, place lettuce cups in a single layer on a tray and refrigerate for 10 minutes before filling.
What's the best way to store leftovers?
Store components separately in airtight containers—keep the beef mixture, cheese, and toppings separate from the lettuce cups. Reassemble only when ready to eat. Leftovers keep well in the fridge for 3-4 days, though the lettuce may soften. For longer storage, freeze the beef mixture only for up to 3 months.
Can I use romaine instead of iceberg lettuce?
Romaine works but won't hold its shape as well for lettuce cups. For a compromise, use half iceberg and half romaine—iceberg for structure and romaine for milder flavor. If you prefer romaine, consider serving over crushed chips instead of lettuce cups for better texture.
How can I make this spicier?
Add ½ teaspoon cayenne pepper or 1 chopped jalapeño to the beef while cooking. For extra heat, serve with a side of hot sauce or diced jalapeños with seeds on top. Adjust to taste—this recipe is naturally mild but easy to customize!