
Salads
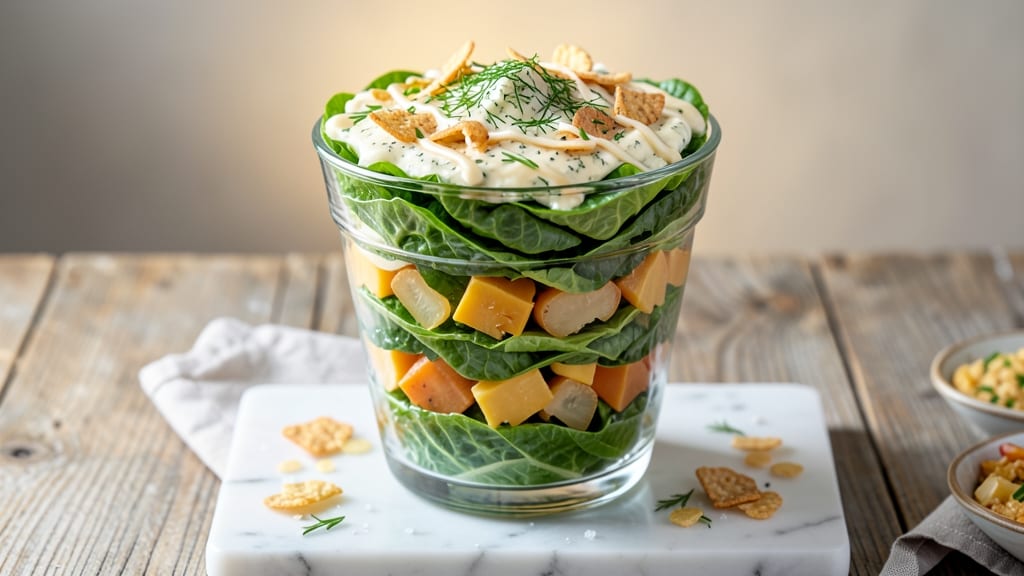
This 9-layer salad recipe transforms a simple bowl of greens into a visually stunning, textured masterpiece that's perfect for gatherings or meal prep. 💛 The key lies in strategic layering—each component adds a different dimension of flavor and texture, from crisp celery crowns to creamy herb cheese layers that bind everything together.
The beauty of this salad is its adaptability—you can customize it for vegetarian diets by omitting any meat or fish layers, and the assembly process is straightforward once you understand the order. The layers should be built from sturdiest to most delicate, ensuring everything stays intact when serving.
What you'll end up with is a salad that's as impressive to look at as it is delicious to eat—crisp vegetables, creamy cheese, crunchy crackers, and fresh herbs all harmoniously balanced. The dressing is the secret weapon, tying every layer together with a cohesive, flavorful finish.
Perfect for potlucks, office lunches, or a special dinner, this salad keeps well in the fridge for up to 3 days, making it an ideal make-ahead dish. Let's build this layered masterpiece step by step.
Ingredients for 9 layer salad
Gather these fresh ingredients to build your stunning 9-layer salad masterpiece.
| Ingredient | Amount | Notes |
|---|---|---|
| Romaine Lettuce 🥬 | 1 whole | Heads separated into individual leaves |
| Celery Crowns 🥬 | 1 cup | Thinly sliced, crisp variety |
| Cheddar Cheese 🧀 | 8 oz | Sharp cheddar, freshly grated |
| Herb Cheese Spread 🧀 | 1 cup | Cream cheese + chives blend |
| Water Chestnuts 🍠 | 1 cup | Drained, finely chopped |
| Rice Crackers 🍞 | 1 cup | Crushed into small pieces |
| Fresh Chives 🌿 | ¼ cup | Finely chopped, for garnish |
| Fresh Dill 🌿 | ¼ cup | Finely chopped, for garnish |
| Lemon Juice 🍋 | 2 tbsp | Freshly squeezed |
| Extra-Virgin Olive Oil 🫒 | ½ cup | For dressing |
| Dijon Mustard 🍯 | 1 tbsp | For dressing |
| Honey 🍯 | 1 tbsp | For dressing |
| Salt 🧂 | ½ tsp | Kosher or sea salt |
| Black Pepper 🌶️ | ¼ tsp | Freshly ground |
The romaine lettuce should be crisp and vibrant—store-brand heads work just as well as organic if you're on a budget. For the celery crowns, look for the thickest stalks at the grocery store, as they hold their shape best. The cheddar cheese matters here: sharp cheddar from the deli counter (pre-grated gets gummy). Freshly grated is a game-changer, trust me. If you're short on time, Trader Joe's pre-shredded works in a pinch, but it lacks that creamy texture. The herb cheese spread is where the magic happens—mix softened cream cheese with chopped chives for that signature creamy layer.
No sharp cheddar? Mild cheddar or Monterey Jack will still work, though the flavor will be milder. Running low on water chestnuts? Substitute finely diced apples for a touch of sweetness, or extra celery for more crunch. The rice crackers can be swapped for crushed potato chips (trust me, it works) if you're feeling adventurous. For the dressing, honey mustard lovers can skip the Dijon and use pre-made honey mustard—just thin it with a splash of olive oil. The key is balancing sweet, tangy, and creamy, so adjust to taste. Fresh herbs are non-negotiable for the garnish, but if you're out, dried herbs at half the amount will do in a bind.
This salad keeps beautifully in the fridge for up to 3 days, making it perfect for meal prep. Store the layers separately in airtight containers—this prevents sogginess and keeps everything crisp. The dressing should be made fresh just before serving, but you can prep all other layers a day ahead. For serving, build the salad in a large glass bowl so guests can see all those stunning layers. The creamy herb cheese layer is the star, so don't skimp on that—it's what holds everything together and makes this salad truly special.
Why You'll Love This Recipe
- No Chopping Nightmare: I swear, the celery crowns and water chestnuts are pre-chopped—just slice the cheese and spread. That’s it. Even my lazy Sundays feel productive.
- Crunchy-Creamy Magic: The sharp cheddar melts into that herb cheese spread while the water chestnuts add a satisfying bite. It’s like a hug for your taste buds—salty, creamy, and crisp all at once.
- Potluck Star: Bring this to a gathering and watch it disappear. It’s hearty enough for a main dish but light enough for a side, and no one will guess it’s just lettuce layers (shhh).
- Leftovers? More Like Zero: Between us, this salad lasts exactly three days in my fridge. But honestly? That’s a win—because it’s so good, you’ll eat it all before then. No sad wilted greens here.
Step-by-step instructions for building your 9-Layer salad
Here's how to assemble this showstopper with perfect texture contrast and creamy layers.
👨🍳 Step 1: Prepare the Dressing for Creamy Cohesion
In a small bowl, whisk together the 0.5 cup extra-virgin olive oil, 1 tbsp Dijon mustard, 1 tbsp honey, 2 tbsp lemon juice, 0.5 tsp salt, and 0.25 tsp black pepper. This dressing is the secret to binding all those layers together while keeping everything moist. The honey and Dijon mustard create that perfect balance of sweet and tangy that complements the sharp cheddar and herb cheese spread.
Taste and adjust seasoning - you want it bright enough to cut through the richness of the cheese layers. The dressing should coat the back of a spoon but still remain pourable. Set this aside while you prepare your components; the flavors will meld beautifully as you assemble.
🥘 Step 2: Layer the Crunchy Foundation
Start with the 1 cup crushed rice crackers as your base in a large glass bowl or serving dish. This creates that essential crunch that carries through every bite. Next, spread the 1 cup finely chopped water chestnuts evenly over the crackers. The water chestnuts add a subtle sweetness and maintain crispness that contrasts perfectly with the creamy layers.
Gently press down lightly with the back of a spoon to create an even surface. This prevents shifting when you add subsequent layers. I like to work in small sections if my bowl is large - it helps maintain clean, distinct layers that look as impressive as they taste.
🥘 Step 3: Build the Creamy Cheese Layers
Sprinkle half of the 8 oz freshly grated sharp cheddar cheese over the water chestnuts, then spread the 1 cup herb cheese spread evenly across. The herb cheese spread adds that signature tangy, herby flavor that makes this salad so distinctive. Next, add the remaining cheddar cheese, followed by the 1 cup thinly sliced celery crowns arranged neatly on top.
Here's where texture magic happens: the celery crowns should be arranged in even rows for visual appeal, but don't worry about perfection - the dressing will bind everything together beautifully. The sharp cheddar and herb cheese spread create that luxurious creaminess promised in the title, while the celery adds refreshing crunch.
🥘 Step 4: Add the Fresh Greens and Final Touches
Separate the 1 whole romaine lettuce into individual leaves and arrange them evenly over the celery layer. The crisp romaine provides that fresh, clean base that balances all the rich flavors. Finally, drizzle half of your prepared dressing over the top, gently pressing it into the layers to help it penetrate.
This is where patience pays off - let the salad sit for 10-15 minutes before adding the final layers. The dressing will begin to work its way down, creating that perfect creamy texture throughout. While it rests, finely chop the 0.25 cup fresh chives and 0.25 cup fresh dill for your garnish.
🍽️ Step 5: Complete and Serve with Style
Add the remaining dressing in an even drizzle, then sprinkle the chopped chives and dill evenly over the top. The fresh herbs add a bright, aromatic finish that elevates the entire dish. For presentation, I like to serve this in a clear glass bowl so all those beautiful layers are visible - it's almost as satisfying to look at as it is to eat.
Let the salad sit for another 5 minutes before serving to allow the flavors to fully meld. The creamy layers will be perfectly balanced with the crisp textures, and each bite will deliver that promised combination of rich cheddar, herby spread, and refreshing celery. Serve immediately with toothpicks for easy portioning - this salad is always a crowd-pleaser!
Pro Tips For Making 9 Layer Salad
- CHOP CELERY SMALL: I learned this the hard way—big chunks of celery in a 9-layer salad just don’t blend right. Dice those celery crowns into ¼-inch pieces so they distribute evenly through all the layers. Trust me, your salad will look and taste more cohesive.
- LAYER CHEESE LAST: The herb cheese spread and cheddar are the glue, so don’t bury them. Add them as the final two layers—press down gently so they melt just enough to hold the salad together when sliced. If you layer them early, they’ll slide right out when you cut.
- DRAIN WATER CHESTNUTS: Canned water chestnuts come packed in syrup or water, and that extra liquid ruins texture. Drain them, rinse briefly, and pat very dry with a paper towel—wet chestnuts make the salad soggy. (Yes, even if the can says “ready to eat.”)
- USE A KNIFE TO SLICE: Skipping the knife and just scooping layers with a spoon? That’s how you get messy, uneven slices. Run a long serrated knife straight down the center of the bowl to cleanly divide each layer. It takes 10 seconds and makes your presentation look like you planned it.
Storing and reheating this recipe
Refrigerator Storage
Store your 9-layer salad in an airtight container with a tight-fitting lid at 40°F or below for up to 3 days. The key is to keep the layers separate—place parchment paper between each layer to prevent sogginess.
I use glass Pyrex containers because they maintain crispness better than plastic. The dressing should be made fresh just before serving to preserve its bright flavors. 💛
Freezer Prep Tips
While this salad isn't ideal for freezing (textures suffer), you can prep individual components ahead. Freeze the herb cheese spread in an ice cube tray for up to 1 month—just thaw and mix with fresh chives before assembling.
The crushed rice crackers and water chestnuts can also be frozen separately in ziplock bags for up to 2 weeks. Thaw overnight in the fridge before building your salad.
Reheating for Best Texture
Since this salad is best served fresh, focus on reheating the dressing separately if you've stored it overnight. Warm the dressing gently in a small saucepan over low heat for 2-3 minutes until just heated through.
Then, toss it with the assembled salad just before serving. The creamy layers will stay rich, while the crisp elements (celery, crackers) remain intact. Never microwave the whole salad—it turns mushy.
Make-Ahead Assembly
For maximum freshness, assemble the salad 1 hour before serving and refrigerate uncovered. The dressing will penetrate the layers beautifully, creating that signature creamy texture. If you're prepping for a party, build it in the serving bowl and cover with plastic wrap pressed directly on the surface.
This keeps the top layer from drying out while allowing the flavors to meld throughout. 💡
Portioning for Parties
For large gatherings, divide the salad into individual glass bowls before serving. This prevents soggy bottom layers and lets guests admire the stunning presentation. Use toothpicks for easy serving—it's especially helpful for the creamy cheese layers that might slide.
I like to arrange the bowls on a wooden tray with fresh herbs scattered around for an elegant touch. The crisp celery crowns stay fresh even when portioned ahead.
Reviving Wilted Greens
If your romaine starts to wilt in storage, don't toss it! Place the leaves in an ice bath for 5-10 minutes to crisp them up again. For the celery crowns, sprinkle with 1 tsp lemon juice and a pinch of salt, then let sit for 10 minutes before reassembling.
The herb cheese spread can be refreshed by mixing in 1 tbsp fresh lemon juice and 1 tsp chopped chives. These tricks work wonders for restoring that restaurant-quality texture. ✨
Nutrition facts
Frequently asked questions
Can I make this salad without rice crackers?
Swap rice crackers for crushed potato chips (like potato chips) or toasted bread cubes for a different texture. For a gluten-free option, use crushed corn chips or pita chips. The key is maintaining that crisp foundation—just ensure your substitute holds up well against the creamy layers.
How do I keep the layers from getting soggy?
Prevent sogginess by assembling the salad 1 hour before serving and storing it uncovered in the fridge. The dressing will penetrate gradually without making everything mushy. For extra insurance, place parchment paper between layers when storing overnight. Also, make the dressing fresh before serving—never add it too early.
What's the best way to customize this for vegetarians?
This salad is already vegetarian-friendly, but you can enhance it further! Add marinated artichoke hearts or grilled tofu cubes for extra protein. For a vegan version, use vegan cheese and dairy-free cream cheese in the herb spread. The crisp celery and water chestnuts provide plenty of texture without needing meat.
Can I make this salad ahead for a party?
Yes! Build the salad 2-3 hours before serving and store it in the fridge. For a party, assemble it in the serving bowl and cover with plastic wrap pressed directly on the surface. This keeps the top layer fresh while allowing flavors to meld. Portion into individual bowls just before serving to maintain that restaurant-quality presentation.
Why does my salad look messy when assembled?
Layering takes practice—start with the sturdiest ingredients first (crackers, water chestnuts) and work your way up to delicate elements (lettuce, herbs). Press each layer lightly with a spoon to create an even surface. If it still looks uneven, try assembling in a smaller bowl first before transferring to your serving dish.